NodeJS in Visual Studio 2017

Hi friends, it has been a while since my last post. But I am back with a small introduction of NodeJS for VS 2017.

A lot of .Net developers (me included) we don’t want to give up using VS for other non .Net type of projects. I was playing a little bit with VS2017 version and its integration to several new templates. In this post I am going to talk about NodeJS projects.

Well, I suppose we all know what is NodeJS if not I am going to explain it in one sentence: It is server side code written in JavaScript. If you want to know more you can google it because there are a lot of great explanations out there.

Open VS and let’s create a new project (NodeJS one) and we can see different types of templates for NodeJS:

Node1 
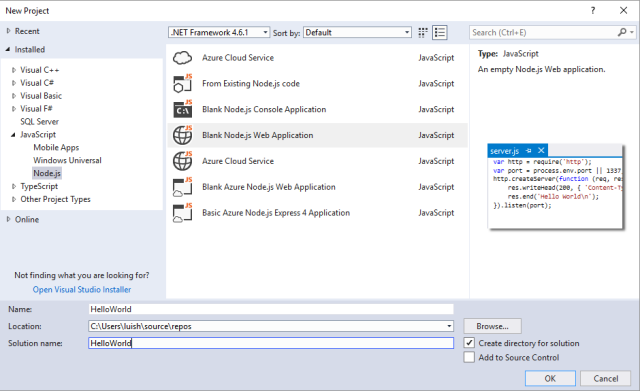
For this post we created a Web Application named HelloWorld (I know, I am not very original). As we can see on the left side the template it’s going to contain the necessary code to create the server and the http objects.


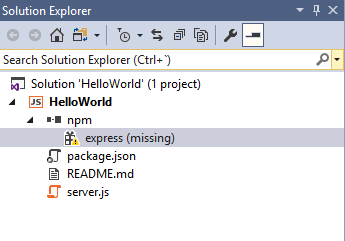
The solution will automatically contain a project with the same name. This project contains:

  • NPM: all the needed dependencies for the project. Later I am going to explain how to install those dependencies.
  • Package.json: It serves as documentation for what packages your project depends on. Also, gives information about the application.
  • Readme.md: a simple text file you can put some notes of the project.
  • Server.js: main JavaScript file.

If we execute the code it will work but nothing is going to happen because there is no render code.

As I mention before, NodeJS projects are not like .Net projects where the dependencies is managed by the Nugget Package. So the way to install those dependencies is quite different. First of all we should know what package we want to install to our project, chekc this https://www.npmjs.com/ to find the package name.

Once you have the package name, you can use the following steps to add in package.json directly.

  • Open up the package.json and type the name and the version of the package on “dependencies”. You may write the “dependencies” tag.

Node3

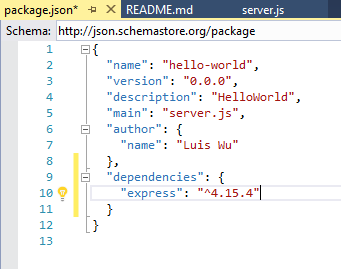
In my expemple I want to install “express” with the version “4.15.4”. Save the package.json and magic will happen. Automatically will start to install the package. If you go to the “nmp” section you will notice that.

Node4

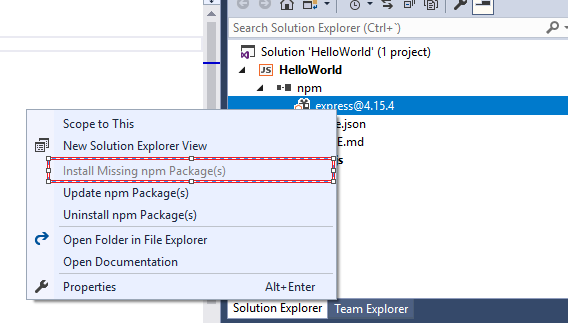
If it still missing, right click and “Install Missing npm Pacakge(s)”.

Node5

And that’s all! Easy right? Now enjoy coding amazing applications in NodeJS. Good luck!

Posted in Visual Studio | Tagged , , , | Leave a comment

Hash string with HMAC-SHA1 Base64 in C#

Recently, I had to encrypt some data in HMAC-SHA1. Out there were several ways to do it, however, I needed in base64 string. With the following function you will be able to hash a string with a given key! I hope it will be useful for you 🙂

 public static string HMACSHA1 (string key, string dataToSign)
 {
    Byte[] secretBytes = UTF8Encoding.UTF8.GetBytes(key);
    HMACSHA1 hmac = new HMACSHA1(secretBytes);

    Byte[] dataBytes = UTF8Encoding.UTF8.GetBytes(dataToSign);
    Byte[] calcHash = hmac.ComputeHash(dataBytes);
    String calcHashString = Convert.ToBase64String(calcHash);
    return calcHashString;
 }
Posted in Sharepoint 2013 | Leave a comment

Migrate MySite profiles SharePoint 2013 with Powershell

One of the good practices of SharePoint is having MySites in a separated WebApplication (WA). However, sometimes in order to save some performance of the server it uses the same WA because the amount of users it is not too huge.

This common mistake starts to gather problems when the number of users increases and the WA starts to working slowly. In order to fix this mistake, there are two ways. The first and easy way is to start to use a new WA from zero and configure the User Profile Service (UPA) for this new WA. However, all the content of mysites from each user won’t be available in this new WA.

The second and the best way, is to create a new WA for Mysites and migrate all the current profiles to this new WA. To do so, I’ve created a Powershell script that make this task easily.

function ParseURL ($url)
{
 #Delete the last "/" if the user entered it
 if($url[$url.Length - 1] -eq "/")
 {
 $url = $url.Substring(0, $url.Length-1)
 }
 return $url
}
$origin = Read-Host ("Introduce the URL of original MySite")
$destination = Read-Host ("Introduce the URL of destination MySite")
$tmpPath = Read-Host ("Introduce the path of backup files")
$webApplicationURL = ParseURL($origin)

$webApplication = Get-SPWebApplication $webApplicationURL
$profiles = @()
Write-Host "*******************************"
Write-Host "Processing $webApplication" -Foreground Green
Write-Host "*******************************"

foreach ($site in $webApplication.Sites) {

 # we have to replace some characters from the url name
 $name = $site.Url.Replace($webApplicationURL, "").Replace("personal", "").Replace("/", "").Replace(".", "");
 if ([string]::IsNullOrEmpty($name)) { $name = "root" }
 # replace all special characters from url with underscores
 if($name -ne "root")
 {
 [System.Text.RegularExpressions.Regex]::Replace($name,"[^1-9a-zA-Z_]","_");
 $profiles += $name
 # define the backup name
 $backupPath = Join-Path $tmpPath ($name + ".bak")

 Write-Host "Doing backup of $site in $backupPath" -Foreground Green
 Write-Host

 # backup the site
 Backup-SPSite -Identity $site.Url -Path $backupPath -Force
 }
}

$webApplicationURL = ParseURL($destination)
$files = Get-ChildItem $tmpPath

foreach($file in $files)
{
 $name = $file.Name.Substring(0, $file.Name.Length - 4)
 $restorePath = Join-Path $tmpPath ($name + ".bak")
 Write-Host "Restaurando el perfil de $name" -Foreground Yellow
 #Write-Host "Lo restauro en $webApplicationURL/personal/$name" -Foreground Blue
 Restore-SPSite -Identity "$webApplicationURL/personal/$name" -Path $restorePath -Confirm:$false -Force
}

I hope this could be useful and if you have any question just comment below.

Posted in Sharepoint, Sharepoint 2013 | Tagged , , | Leave a comment

C# function called from JavaScript

Sometimes you need to call a C# function of your code behind source from your client side code. I was looking a good way to do it and not overload my application with several calls to the server.
For instance, a button or action that need to do something and need a server side function. In your .js file you will need:


function callCS()
{
    __doPostBack('', 'CSFunction');
}

Actually, you are doing a postback with an event, then in the Page_Load you have to capture this event in the following way:


if (Request["__EVENTARGUMENT"] == "CSFunction")
{
   //Execute code - Call my C# function
}

I think this is an easy way to call C# functions from javascript code. I hope this could be helpful and if you have suggestions, please do not hesitate to post it.

Posted in Sharepoint 2013 | Tagged , , , | Leave a comment

Create a Document Set in a Library by WCF Web Service using POST method

In this post I will explain a way to create a WCF service (Framework 3.5) that creates a Document Set inside to a given Library which has to be configured with the Document Set content type previously.

As the title of this post says, we will need to configure our Web Service to receive POST method. Why? Because for create a Document Set if you call GET method it will return the following error:

Updates are currently disallowed on GET requests. To allow updates on a GET, set the ‘AllowUnsafeUpdates’ property on SPWeb.

After debugging step by step I found that web.ValidateFormDigest it is called and will never validate for a GET request. So there are two options, first and the “dirty” way disabling form digest validation on webapplication level using SPWebApplication.FormDigestSettings.Enabled = false in you code. However, the security of your application will be compromised, so I strongly do not recommend to do it.
A workaround is to set up your Web Service allowing POST method. Basically, to allow POST calls you have to modify the web.config of your WCF. For doing that it is needed to define webHttpBinding and mexHttpBinding.

Inside the web.config, inside the System.ServiceModel tags put the following code:

<services>
      <service name=”WcfService.MyService” behaviorConfiguration=”myServiceBehavior” >
        <endpoint name=”webHttpBinding” address=”" binding=”webHttpBinding” contract=”WcfRestBased.IMyService” behaviorConfiguration=”webHttp” >
                </endpoint>
        <endpoint name=”mexHttpBinding” address=”mex” binding=”mexHttpBinding” contract=”IMetadataExchange” />
      </service>
    </services>

Where in the field name you have to put the name of your service.  Now it is necessary to set up the behaviour of our web service. Just below the code added of the service add the behaviour configuration:

<behaviors>
      <serviceBehaviors>
        <behavior name=”myServiceBehavior” >
          <serviceMetadata httpGetEnabled=”true”/>
          <serviceDebug includeExceptionDetailInFaults=”false” />
        </behavior>
        <behavior>
          <serviceMetadata httpGetEnabled=”true”/>
          <serviceDebug includeExceptionDetailInFaults=”false”/>
        </behavior>
      </serviceBehaviors>
      <endpointBehaviors>
        <behavior name=”webHttp”>
          <webHttp/>
        </behavior>
      </endpointBehaviors>
    </behaviors>

Now your service will accept POST method. Create your method of creating a Document Set (Explained in a previous post) and call it using POST and it will be created.

Posted in Sharepoint | Tagged , , | Leave a comment

SharePoint List – Show / Hide List Column Using Powershell

Sometimes it is necessary to hide some list columns or fields in the forms. Some fields are important for the administrator, however, for the users it is not important and you want to hide it from them.

The following script hides/shows fields from the different forms(Edit, New, Display…)  in a sharepoint list.

param ($webUrl)
$columnNames = "columnName1", "columnName2", "columnName3", "columnName4"

$web = Get-SPWeb $webUrl

$list = $web.Lists["ListName"]

foreach($name in $columnNames){

 $column = $list.Fields[$name]
 $column.ShowInEditForm = $false
 $column.ShowInNewForm=$false
 $column.ShowInDisplayForm=$false
 $column.ShowInViewForms=$false
 $column.Update()
}

$list.Update()

$web.Dispose()

If you want to show in stead of hiding, change $false for $true. I hope this could be helpful!

Posted in Sharepoint, Sharepoint 2013 | Tagged , , , , | Leave a comment

The Followed Counts Web Part is blank

While I was configuring a Sharepoint enviroment for one of my customers I realized that the followed counts of MySite was in blank or empty.

1

First of all I checked the webpart in case was not added (in MySite it is automatically added). But that wasn’t the problem, won’t be that easy. So, I started to digging about the problem and after hours of investment, it come to my mind that it could be permissions issue.

If you want to resolve this problem, follow these steps:

  1. Open Central Administration… Manage Service Applications…
  2. Select the User Profile service application, but don’t click “inside” of it, just to the right of the text, so that the row is highlighted and the ribbon is shown
  3. In the “Sharing” group of the ribbon, click “Permissions”
  4. In this prompt, put in your service account that is running your Distributed Cache, and grant it full control

Note: Performing this action may cause the User Profile Services web services to be restarted, so it shouldn’t be done in the middle of the day.

Your newsfeeds should now be working and the Following webpart too!!

Posted in Sharepoint 2013 | Leave a comment

The tool was unable to install Application Server Role. Web Server (IIS) Role.

If you want to install Sharepoint 2013 on a Windows Server 2012 R2, some problems will arise because there is a small error which is fixed with Microsoft Sharepoint 2013 SP1. However, SP1 has other flaws and is not as stable as we wish. Here there is a way in which you can install Sharepoint2013 in Windows Server 2012 R2. If you are trying to install Sharepoint 2013 in Windows Server 2012 R2 probably will appear the following error: roleerror     As you can see the error is “The tool was unable to install Application Server Role. Web Server (IIS) Role. “Although we have entered into the IIS server roles. Then automatically the following programs that are required for installing Sharepoint 2013 are skipped. The only way to proceed is to install the prerequisites manually. Then I will explain how to do it. First of all, prepare the environment to do that. Open a Powershell with administrators rights and enter the following commands.

Import-Module ServerManager

Add-WindowsFeature NET-WCF-HTTP-Activation45,NET-WCF-TCP-Activation45,NET-WCF-Pipe-Activation45 -Source D:\Sources\sxs

Add-WindowsFeature Net-Framework-Features,Web-Server,Web-WebServer,Web-Common-Http,Web-Static-Content,Web-Default-Doc,Web-Dir-Browsing,Web-Http-Errors,Web-App-Dev,Web-Asp-Net,Web-Net-Ext,Web-ISAPI-Ext,Web-ISAPI-Filter,Web-Health,Web-Http-Logging,Web-Log-Libraries,Web-Request-Monitor,Web-Http-Tracing,Web-Security,Web-Basic-Auth,Web-Windows-Auth,Web-Filtering,Web-Digest-Auth,Web-Performance,Web-Stat-Compression,Web-Dyn-Compression,Web-Mgmt-Tools,Web-Mgmt-Console,Web-Mgmt-Compat,Web-Metabase,Application-Server,AS-Web-Support,AS-TCP-Port-Sharing,AS-WAS-Support, AS-HTTP-Activation,AS-TCP-Activation,AS-Named-Pipes,AS-Net-Framework,WAS,WAS-Process-Model,WAS-NET-Environment,WAS-Config-APIs,Web-Lgcy-Scripting,Windows-Identity-Foundation,Server-Media-Foundation,Xps-Viewer -Source D:\Sources\sxs

Be careful with -Source, is where you have mapped your instalation source of your image of Windows Server 2012 R2, it also will work without specifying any source. However, you will have to have internet connection. Now that your enviroment is ready download the pre-requisites manually.

SQL Server 2008 R2 SP1 Native Client

Microsoft WCF Data Services 5.0

Microsoft Information Protection and Control Client (MSIPC)

Microsoft Sync Framework Runtime v1.0 SP1 (x64)

Windows Identity Extensions

Windows Identity Foundation (KB974405)

Windows Server AppFabric

CU 1 for AppFabric 1.1 (KB2671763)

Install all the prerequisites in that sequence EXCEPT for the last two (AppFabric and CU 1 for AppFabric). AppFabric needs a speacial configuration, within a Powershell with administrator rights. Navigate to the folder where you dowloaded Appfabric. After that execute the following command:

WindowsServerAppFabricSetup_x64.exe /i CacheClient","CachingService","CacheAdmin /gac

Notice that there are quotas, do not erase them because is for separating the comas. Now you can install CU 1 for AppFabric 1.1 (KB2671763). Finally restart your server and you will be able to install Sharepoint 2013!!

Posted in Sharepoint 2013 | Tagged , , , , | 8 Comments